01 - Dev. Env. Setup
Requeriments:
- Completion of Lab 01
Learning outcome:
- Minimal working template for PlatformIO projects
- Making Static libraries
Task 1 - System Identification
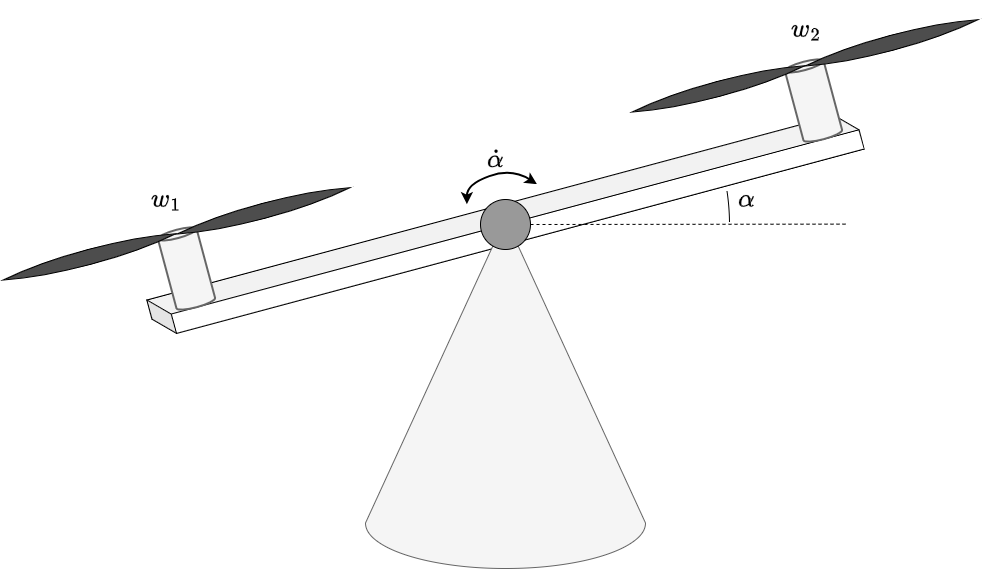
Given the following system:
 |
|---|
| Figure 1: Seesaw model. |
Where:
- and are the angular velocities of the motors.
- angle of the system.
Task 1.1: Identify which signals depicted in figure 1 of the system are the input and output of the system
Task 1.2: Which energy reservoirs can you find? What are the states of the system?
Task 1.3: Given this dynamic system model:
Comment and explain your rational on whether the system i:
- time varying / time invariant
- linear / non-linear
- causal / acausal
- memoryless / dynamic
Task 2 - PlatformIO Project Creation
Create a new project named assigment-01, with the following configuration parameters:
platform = espressif32
board = esp32dev
framework = arduino
Task 3 - Making Network Manager
Task 3.1: Create a local network library with the name NetworkManager.
assigment-01/
└─ lib/
   └─ NetworkManager/
Task 3.2: Create a library interface that follow this design for intanciation.
#include <NetworkManager.h>

NetworkManager net;
Task 3.3: Ensure that your implementation sets a custom hostname for the ESP32. Reference material: ESP32 Setting a Custom Hostname.
Task 3.4: In the NetworkManager implementation a method called begin() with the following signature, that inicitalize the network.
void NetworkManager::begin()
In order to initialize the network:
- Try to set the ESP32 in STA mode (Station Mode) to connect to the network SSID
iotlabpassword12345678 - If STA mode fails, fallback into AP (Access Point mode) and Create a network using your robot hostname* as SSID and set any password with at least 8 characters (WAP2). Reference material: https://randomnerdtutorials.com/esp32-useful-wi-fi-functions-arduino/
Task 4 - Making OTA Manager
Task 4.1: Setup OTA, under the folder lib create a local library called OTAManager
Task 4.2: Create a the library in a way that allow you to import like #include <OTAManager.h> and instancie as OTAManager ota;
Task 4.3: Witn in the OTAManager implementation a method called begin() with the following signature that inicitalize the OTAManager.
void OTAManager::begin()
Note: you can use any OTA library, for simplicity ArduinoOTA is a good starting point. Example code: https://github.com/espressif/arduino-esp32/blob/master/libraries/ArduinoOTA/examples/BasicOTA/BasicOTA.ino
Resume
The final working code should look like. Your are free (and encorage) to improve the current definitions and implementation.
#include <Arduino.h>
#include <NetworkManager.h>
#include <OTAManager.h>

NetworkManager net;
OTAManager ota;

void setup()
{

  Serial.begin(115200);
  delay(200);

  net.begin();
  ota.begin();
}

void loop() {
  ota.handle();
  delay(100);
}